|
............Ashley's guide to low tech digital caricature. |
||
|
|
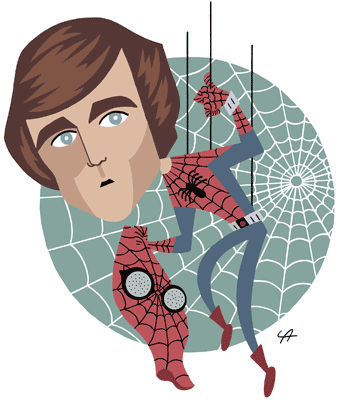
In keeping with my current self-promotional series of pop culture figures from my childhood in the 1970s, today's caricature target is Nicholas Hammond, star of the regrettable Spider-Man tv series. Hammond's face is not well-known, but I happened across an old video of the show in a closeout sale and decided to include him just for kicks since I had the reference. (It's a good excuse to draw Spider-man, after all, which is always fun.) The photo here is the only one I could find on the web that comes close to the bug-eyed, "deer in the headlights" expression I was trying to capture from the video. |
|
|
I start by freeze-framing key images on the video and sketching them. Video reference is ideal for catching people in moments of prime expression, as opposed to publicity photos when they're posing. At this early stage I don't expect of my crummy drawings to look anything like Hammond. I'm just exploring the face for information and making decisions about how to approach his likeness. His big, 70s hair, wide eyes and tiny mouth (which often hangs open in alarm) are immediately noticeable, but his bulging cheek bones and pointy chin reveal themselves more clearly after a few sketches. Also, that thingie between the nose and lip is very prominent (what IS that thing called, anyway?). I get a good idea of what I want quickly today, but some caricatures require a struggle of dozens and dozens of sketches. I've been known to do 100 or more if things are going especially poorly. |
|
|
|
|
Finally I take a stab at drawing his head. Ordinarily I draw the head and the body separately and put both rough sketches together on the computer, but today I try mapping out the head on the thumbnail and get something fairly close to what I want. I trace over this with a pen to help define it for scanning. This sketch is very close to the size it appears here, though I usually produce much smaller body sketches. I find working very tiny in the earliest stages helps to keep the basic composition together. |
|
|
The thumbnail sketch is scanned and blown up to fill an 8 1/2 x 11 sheet. This is printed and gone over again on a light table to clean it up for inking. I notice at this point that Nick's left eye is looking a little lazy, so I adjust it on the inked piece. (You'll notice I was also forced to change his hand after realizing that he couldn't grip a wire on his back with a fist that went forward.) While inking, I'm anticipating filling the drawing with color, so I make sure all areas are enclosed with line. The exception here is the webbing, which I avoid closing off in certain areas. You'll see why in a second. |
|
|
|
|
Now the line drawing is scanned into MS Paint, where it is filled with color. Here I begin the task of eliminating the linework piece by piece by blocking off the connecting lines, as shown at right, and filling the outline with the bucket tool. (This is why I left so many of the web lines disconnected.) Photoshop and Illustrator can both achieve the same effect, but I prefer this low tech method because moving the mouse around like this feels more like painting. And I can correct and adjust the art in a more naturalistic, linier way. |
|
|
My intention is to have a black background with white web lines (the way is was in the opening credits of the tv show), so first I fill the background with with a temporary color. |
|
|
|
|
Then I fill the black web lines with white, and change the green areas to black. But at this point I decide it's too busy and experiment with other colors for the background. |
|
|
Now I use the Paint brush complete the web lines in the costume and connect the white lines in the background. Plus plenty of nip and tuck of the pixels to smooth things out and adjust the likeness. In this case I've hacked off part of the jaw to reduce the "John Kerry" effect I was getting and reworked the mouth. Outlining the nose seems to help distinguish it, though I try to avoid outlines when using this style if I can. As I stare at it for the next day or so, I'll continue to find things I want to change (at the moment, I'm not crazy about the masses of light brown in his hair, so I may try a different approach), particularly if helps the likeness. Those well-versed in the bells and whistled of more sophisticated graphics programs (and they're ALL more sophisticated than MS Paint) will consider my method incredibly tedious. But after my line art is scanned, the bulk of the color fills and line erasers take me only about an hour, with maybe an additional 30 minutes to an hour for cleanup and detail work. |
|
|


